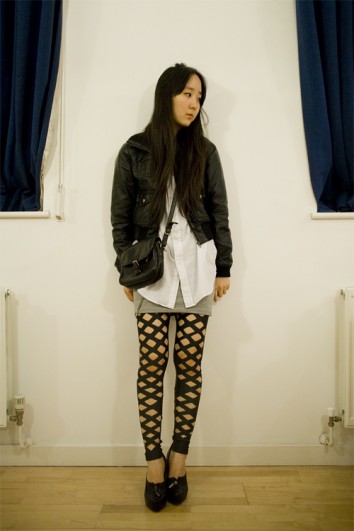
DIY Leggings and Knit for Charity!

I was just think about how much I want customized leggings.
Then I happen upon this tutorial!

img_8969-354x531

Also,

Do a little something for someone in need (as well as your karma!) and try kFollow my blog with bloglovinnitting for charity.
This organization, Knit-a-Square puts together 8×8 squares knitted by charitable knitters like you from all over the world into blankets for children living in poverty in South Africa.
It’s such an easy way to make a difference in a child’s life, and as the ladies at Knit-a-Square say;
“A dollar lasts a day, blankets are for life.”

DIY Leggings and Knit for Charity!

I was just think about how much I want customized leggings.
Then I happen upon this tutorial!

img_8969-354x531

Also,

Do a little something for someone in need (as well as your karma!) and try knitting for charity.
This organization, Knit-a-Square puts together 8×8 squares knitted by charitable knitters like you from all over the world into blankets for children living in poverty in South Africa.
It’s such an easy way to make a difference in a child’s life, and as the ladies at Knit-a-Square say;
“A dollar lasts a day, blankets are for life.”

Crayon Letters and Heart Stuffies!

I promised myself I would write at least one post a week when I started this blog. I sadly haven’t been living up to my promise.

BUT, things are changing. I’ve had like a super-nova of midterms and school-related things, but I have been working on something that I’m really excited about, and I’ll probably get it done this weekend!

Here’s my belated Valentine’s Day Crafts, in my attempt to make up for blog-procrastinating… Blogcrastinating.  (Um.. can I trademark that?)

It was all pretty experimental.
The crayon letters were kiiinnnddaaa alot of trouble. They turned out pretty cool, so I think they were worth it, but there is probably an easier way of going about it.

  • First I took cheap air-dry clay and carved our letter shapes, so that it looked like a little letter-shaped bowl.
  • I let those harden overnight, but they were still a little wet when I used them as molds, which turned out to help me in the end.
  • I heated water on the stove, then in a double-boiler-like fashion, I melted each color in a separate bowl resting in the hot water. (All my colors were generally the same so I didn’t have to clean the bowl in between crayons, but you should consider it if you are melting really different colors)
  • Next, I poured the melted wax into the molds and let it harden. (take about 5 minutes)
  • After it was dry, I carefully cracked off the clay mold (kinda like an archeologist!) 
  • There was still some clay bits attached so I soaked the crayons in cold water and rubbed off the wet clay. 

And that’s all!!

The heart plushie was super simple
 I just knitted one side of this heart pattern: http://mochimochiland.com/weblog/2007/02/free-pattern-hearts/  
(Didn’t felt it) Then sewed it to some cute fabric (leaving a hole), turned it inside out, stuffed it, then sewed up the whole.
I was trying to embroider it, but my only needle broke. 😦

The Two-Dollar Ruffle Scarf!

I have to constantly remind myself how lucky I am to have a thrift store on my college campus.
Ohhh. Yes.

I was rummaging through their sweater collection and picked up this nifty green wool turtleneck sweater.
With Threadbangers’s 100th Episode fresh in my mind, I set to work!


Tadaa!!
The Threadbanger tutorial is for a wrap-style scarf, but I switched it up a bit and added some pleats.


Scroll down for my tutorial!

.

.

.

.

.

.

 Start out with any stretchy sweater.
Cut a straight line from armpit to armpit, and separate the body from the arms and neck.

Cut off the bottom hem.

Now you have this circular rectangle thing.

Cut off the seam at one side,
giving you one big rectangle.

Finally, cut this big rectangle in half lengthwise (hot-dog style),
So you end up with two thinner rectangles.


Next, pin together the two thing rectangles with their right sides facing.

Sew the pieces together, first with a straight stitch, then with a zigzag stitch. (Why? I dunno, that’s what threadbanger told me.)

Now you have one longgg rectangle!


Using a zigzag stitch sew around the entire perimeter of the scarf, stretching it as you go.

This will give you a pretty cool ‘lettuce-edge’.


 On the Threadbanger video I linked to up there ^,
they demonstrate sewing the lettuce edge, if you’d like yourself some more visual stimulus.

In this picture, I haven’t sewn the lettuce edge at the ends of the scarf yet, don’t forget to do that! 

Next, lay the scarf out and fold it over itself, over and over until you get little pleat-ruffle things.
Pin them in place. 

You can do this however you like, I think mine are about 1-1.5 inches wide.


If you have patience, you can arrange the pleats to hide the seams of the sweater.

When you fold the pleats, center the seam on the inside of the “S” the fabric makes.

If you do this right, you shouldn’t be able to notice the seams after you sew it!


Finally, sew a zigzag stitch straight down the middle.

Take out the pins, fluff out your scarf, and promenade around town!

The Two-Dollar Ruffle Scarf!

I have to constantly remind myself how lucky I am to have a thrift store on my college campus.
Ohhh. Yes.

I was rummaging through their sweater collection and picked up this nifty green wool turtleneck sweater.
With Threadbangers’s 100th Episode fresh in my mind, I set to work!

Tadaa!!
The Threadbanger tutorial is for a wrap-style scarf, but I switched it up a bit and added some pleats.

Click for my tutorial!

Start out with any stretchy sweater.
Cut a straight line from armpit to armpit, and separate the body from the arms and neck.

Cut off the bottom hem.

Now you have this circular rectangle thing.

Cut off the seam at one side,
giving you one big rectangle.

Finally, cut this big rectangle in half lengthwise (hot-dog style),
So you end up with two thinner rectangles.

Next, pin together the two thing rectangles with their right sides facing.

Sew the pieces together, first with a straight stitch, then with a zigzag stitch. (Why? I dunno, that’s what threadbanger told me.)

Now you have one longgg rectangle!

Using a zigzag stitch sew around the entire perimeter of the scarf, stretching it as you go.

This will give you a pretty cool ‘lettuce-edge’.

On the Threadbanger video I linked to up there ^,
they demonstrate sewing the lettuce edge, if you’d like yourself some more visual stimulus.

In this picture, I haven’t sewn the lettuce edge at the ends of the scarf yet, don’t forget to do that!

Next, lay the scarf out and fold it over itself, over and over until you get little pleat-ruffle things.
Pin them in place.

You can do this however you like, I think mine are about 1-1.5 inches wide.

If you have patience, you can arrange the pleats to hide the seams of the sweater.

When you fold the pleats, center the seam on the inside of the “S” the fabric makes.

If you do this right, you shouldn’t be able to notice the seams after you sew it!

Finally, sew a zigzag stitch straight down the middle.

Take out the pins, fluff out your scarf, and promenade around town!