Saw this on Pinterest : http://pinterest.com/pin/190023664/
and thought I would dress it up a bit:
TaDaa!!

I have had the urge to do Doctor Who crafts lately…

Saw this on Pinterest : http://pinterest.com/pin/190023664/
and thought I would dress it up a bit:
TaDaa!!
I have had the urge to do Doctor Who crafts lately…
One of the beefs I’ve always had about Father’s day is that it is always centered around gifts for the professional dad. Back in elementary school we decorated ties, all the advertising is about golf, fancy briefcases and so on…
What if your dad doesn’t even know how to tie a tie?
What if he thinks golf is for sissies?
What if he would use a fancy briefcase to store his sandy fishing supplies?
My dad is a mechanic, an ocean-lover and a native San Diegan.
And I’m sure there are plenty of people out there with a dad like mine, so I made my very own gift list with the things I would get MY dad.
Punny Fish Card

Fish + Puns? Gold! You don’t know how many Halibut jokes my dad has cracked over the years…
$3.75 from paperanniversary
 Bottlehood is a local company I see every Sunday at the farmer’s market. They re-purpose endless varieties of bottles into candles, drinking glasses, vases and even lamps! I love the candles because they look like they’re filled with beer.
$25 for two
A Play on “Padres” Tshirt  I have many a memory of my dad watching Padre’s games, usually while my sisters and I bothered him to change it to cartoons. Instead of buying Padre-logo sportswear, this shirt has more of a personal edge, it translates to “Father since…” and the year is customizable!
$30 from PamelaFugateDesigns
His Dream Car

…in miniature form, of course. One year, in about 7th grade, my dad bought an old Chevelle as a project car. Red, just like this 1/24 scale model from classicwrecks! This model is specifically painted to look like a rusted old wreck, which would be perfect because the only ride I ever took in that car ended in us pushing it to the gas station.
$37.50 from classicwrecks
The Catch of the Day My dad is an avid sports fisher and would occasionally drag us girls to boat shows. Even though seeing fish with hooks in their lips was almost enough to turn me vegetarian, I still appreciated the dinners he made from them… How’s that for locally-sourced food?
$69.00 from SlippinSouthern
Beer Towels for Cleaning up… Beer Spills! Towels are one of those things dad’s (or at least my dad) just doesn’t buy. He has had the same towels for YEARS. I should do him a favor and get him these beer-themed towels from NestaHome. $23.50 for a set of 4
Vintage Hubcap Clock
 I imagine my dad’s dream garage filled with tools and muscle cars would have this clock in it. But I’m sure if it was his dream garage, there would be no need to keep track of time, he probably would be there ALL the time!
$ 42.00 from 8milecreekdesigns
Beer Soap
When my mom’s back was turned, Dad would say “Go get me a DaddyJuice!” and have us retrieve beers from the fridge for him. I think even my mom would approve of this beer though… it’s soap!
2 for $14.50 from EthicallyEngineered
Fish Art Blocks When getting Dad anything in the art-realm, I try to look for something a little less hoity-toity then a hanging painting… These wooden art blocks are perfect! You can stack them and you get to mix and match between 14 different fish. Creator johnwgolden is even having a father’s day sale, 25% off all orders. $22 for a set of 7
And Finally… Another T-Shirt Dad, I love you but… BUY MORE SHIRTS! He seriously can wear the same 5 shirts for years and years on end. So for my final gift option, this ship-in-a-bottle print from flytrap. Talk about the gift that keeps on giving. And giving and giving and giving and giving, until I get him another t-shirt. That man DOES NOT clothing shop.
I hope this list gave some gift inspiration for all those beer-drinkin’, fish-lovin’, car-fixin’ dads out there! If you want to DIY a gift, check out my post from last Father’s day, when I made a fish-themed lazy suzan. It’s on his dining room table right now!
Happy Father’s day!
❤ Sam
I admit to being somewhat of an impulse shopper.
I’ve been working on controlling the urges, but when I saw this vintage bike on craigslist, I couldn’t help myself.

At least this time my impulse shopping ended up with a form of transportation!
Her name is Mel C, she’s a Peugeot Mixte, circa sometime-in-the-70s. I am super excited to polish her and tune her up. Why Mel C.? Well, she’s totally a sporty spice!

I’ve been learning more about bike repair from The Chainbreaker Bike Book.
Which I totally recommend. It’s great if the only thing you know about bikes is how to ride them. It even has tips on being a female in a male-dominated bike scene, which I appreciate because I know the only time I ventured into a bike shop (aside from the buddies that work next to me) I was pretty darn intimidated. All those tattooed bike guys should be a GOOD thing, if ya know what I mean…
Aside from that, I now have a bike worthy of the Tweed Ride! (Sorry faithful mountain bike)
If you haven’t heard of a Tweed Ride:
Vintage Bikes +
Vintage Clothes +
Beards & Bowties=
Mobile Awesomeness.
And I am a huge fan of beards and bowties, btw.
 That’s something to look forward to this winter! I need to start collecting tweed… and perhaps a banjo.
 via Riding Pretty
Oh, the possibilities of a new bicycle. I’m imagining myself riding into the sunset wearing tweed skirt and sensible pumps, banjo slung over my shoulder. Tweed Ride, I await you!
Peace and Bikes,
Sam
Here one trend I am dying to DIY:
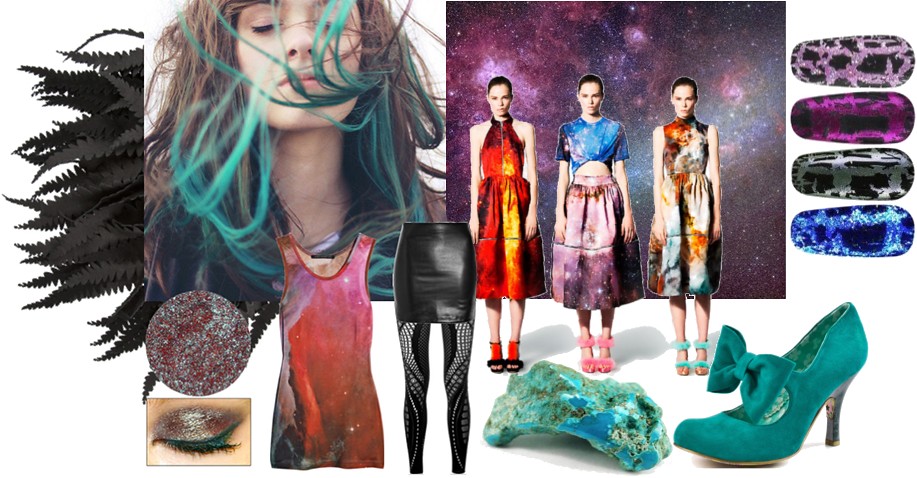
Outerspace!
Maybe my obsession stems from the fact that I have been on a huge Dr. Who kick recently, and as such, have constellations perpetually revolving around my subconscious…
But regardless, I think I just really want the privilege of wearing the universe on my bum (it’s big enough!).
I love the look of printed stars and galaxies along with leather, velvet, and of course plenty of glitter. Yet at 200 bucks a pop (just for the tank top!), I don’t think I’ll get my hands on Christopher Kane’s designer duds anytime soon.
After scouring the web, I found some awesome cheaper alternatives to satisfy that cosmic craving:
 Burger and Friend’s “None Like it Hot” glitter dress $48, Antenna Galaxy
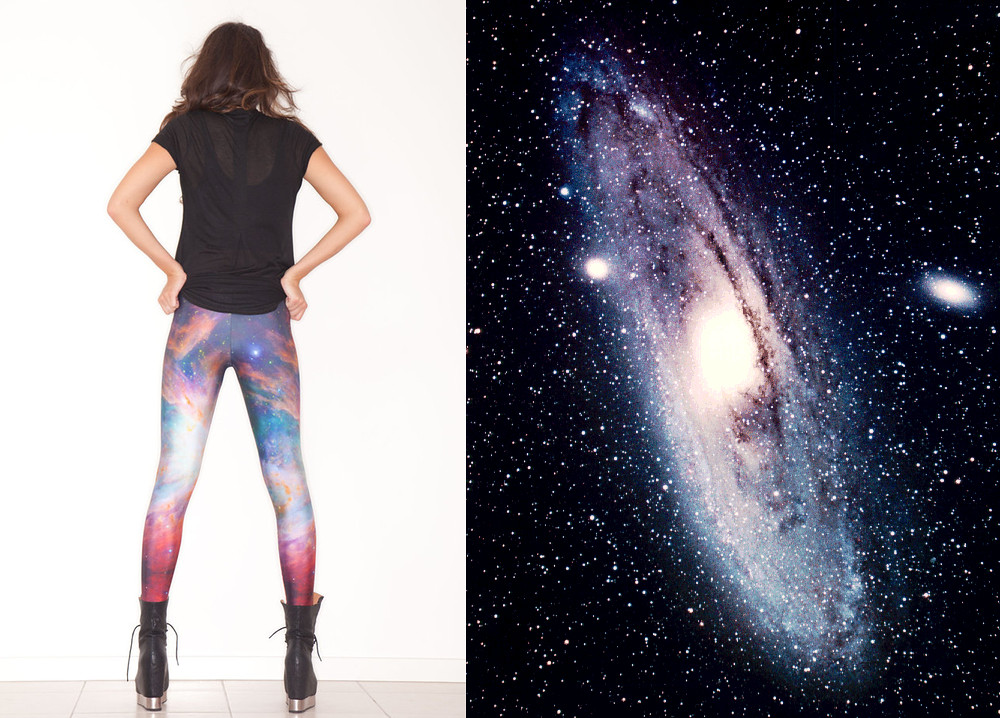 Black Milk’s “Rainbow Galaxy” leggings $75, Andromeda Galaxy
While I would die for those leggings, they are still a bit pricey for me. So maybe I should DYE for those leggings! Get it? Get it? Dye… ha?
I’m currently researching the best way to achieve that galactic look… possibly a mixture of bleach, dye, glitter and screenprint ink?
User cervy on Craftster accomplished some celestial undies with acrylic paint, but I’m not sure how well acrylic would do on leggings or light fabric.
I think I need to just dive into it and get some trial-and-error experience. Or should I say launch into it? Blast off? Calling Major Tom? Alright enough astronaut references.
Though accomplishing a good outer-space DIY would be an achievement of astronomical proportions!
Hahaha… ACK! *gets kicked off stage*
Imagine my blog bursting through the surface of the sea, gasping for air and spewing salt water.
IT’S ALIVE!
Floating towards an island, clinging to some driftwood, my blog thinks of all the possibilities of the future, a life renewed, released from it’s watery prison of neglect.
It launches itself upon the pristine sands of the island’s shore and, rolling over to face the radiant sunlight, embraces it’s second birth.
10 points for being overly dramatic
Well here it is! I’ve decided to start blogging again. I’m not sure why I stopped in the first place. Last time I posted, I had pink hair and was on wordpress. Now I have dark hair again (with blueish undertones!) and I have migrated to blogger. (All of my old posts are here too)
I hope to be blogging a lot more regularly because I have decided that:
1. I have too much clutter
2. That clutter is mostly crafting supplies
3. I must therefore use up all of those crafting supplies
4. And document the craftyness upon the interwebs.
I hope to open an etsy shop eventually too! (Sell things I make with my old crafting supplies to afford to indulge myself in new craft supplies. It’s a cycle.)
Here’s a sneek peek of the projects I’m working on:
 My disastrous workspace


 Pyrite, studs and feathers!
 Extraneous Mexican Sweet Bread Photo

❤ Sam
I love Katy Perry.
I mean, her music is catchy and fun and everything, but the REAL reason I love Katy Perry?
Let the following images demonstrate:


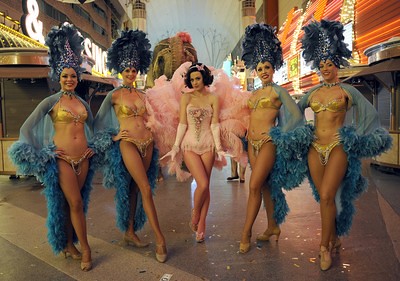

My goodness, I don’t know why I love it so much.
Pastels and candy and kitschy pink flamingos and ridiculous latex dresses!
I must have a sugar deficiency.
But I LOVE it!
I’m just glad someone out there can be like:
“Ya know, I’m gonna wear a latex dress today. Now, should it be cotton candy or pink palm tree print… Decisions.. “
As well as:
“If I want to wear candy on my head and shoot whipped cream out of my bra, I will, by golly!”
So wonderful.
Maybe it’s just a marketing scheme, but at least she always looks like she’s having fun.
Maybe that’s why I think that Katy Perry > Lady Gaga.
I mean, when you are wearing amazingly ridiculous outfits, you can’t take yourself toooo seriously.
Anyways, I somehow stumbled over the fact that OPI nail polish just released a Katy Perry collection.
Observe in the following video:
I don’t always wear nail polish but the colors are just 100% Katy Perry. Spot on.
Usually celebrity lines of anything are nothing more that the person’s face and name attached to a product, but these colors just seem so… her.
It’s like essence of Katy Perry in a bottle.
Therefore I have broken down and bought a mini sample pack (only 6 bucks on amazon!) because I am convinced that I need to start up a kawaii/cotton candy/ bubblegum/ katy perry lifestyle once more.
My hair is on it’s way back to black anyway, and one of the benefits of that is I can wear crazy colors in places OTHER than on my head! Yay!
Ok, must go now. I need to go stock up on cookies and glitter.

I. Must. Have. This.

So this is my random attempt at doing “business casual”.
Backstory: After many hours staring off into oblivion, contemplating the “WHAT ARE YOU DOING WITH YOUR LIIIIIFFEEE??” question, I decided that I needed to start looking into big-girl jobs for after I graduate (I have 1 year left at my university).
But, GAH!
There are so many things you have to do like:
Workshops! Internships! Mentorships! Career fairs! Career advising! More workshops! Resume workshops! This-is-why-you-suck-but-we-can-help-you-maybe workshops!
And soon I found myself in that last workshop, with a very prim woman insisting that I learn how to dress business casual.
Business casual?
Bleh!
But I thought I’d give it a try.
The blazer is my roommate’s, white shirt is thrifted, and everything else is from Target. (Seriously, EVERYTHING else… ![]() )
)
And, I’m not gonna lie; I not going to wear those shoes. I have a chronic heel problem (that is, a problem with the shoes, not a medical problem lol) which I am sure I will divulge later in this blog, but I never wear heels.
Yep business casual is like living a lie, but you do these things when you are trying to be a grown up.
And it sometimes it definitely feels like you are wading through your quarter-life-crisis with nothing but a pair of swim trunks and some water wingies but…..
at least the water is only neck deep?
 Water wingies. Now on my wishlist.
Toodles,
Sam
FAAAAAAAAAAAAAAAAAAAAAAALLLLLLLLLLLLLLLL!!!!
Well. Here in San Diego, it’s not like the weather changes or the leaves turn colors, more like they started displaying Halloween merchandise in the grocery stores…
HALLOWEEN!!!
My favorite time of year.
This year I am getting all Martha-Stewart all over the place. I want to have a dinner party! I want cute decorations! Handmade costumes! Tasty food!
Ahh I’m getting all tingly inside.
My first reaction when I saw the stacks of halloween candy on display in Ralph’s was: “It’s way too early for this!”
Then I realized:
IT IS NEVER TOO EARLY!
I’ve already started browsing costumes. After seeing these masks, I’m pretty sure I want to be a forest creature:


Top two from Etsy seller beadmask, bottom two from faerywhere.
Beautiful! These masks are made of painted moulded leather, and for how intricate they look, are really well priced! Unfortunately I am still too poor 😦
But that won’t stop me! I found this tutorial on deviant art on the leather mask-making technique.
I really love the look of the leather, its texture and ability to fold make the masks look so whimsical and midsummer-nights-dream-like.
I just want to have a dinner party at dusk, dress all my friends in these masks, set up a table in a forest with some fireflies zipping around, with our plates of food on moss place mats and our wine glasses set upon little red mushroom caps.
But there are no fireflies in Socal *cry* (But that doesn’t mean I can’t pretend)
Well, stay tuned for a massive two month long Halloween geek-out, friends, stay tuned.
:0 *boo*
So I was walkin’ to the farmer’s market with a buddy, mindin’ my own business..
When out of nowhere I stop dead in my tracks. *SCREECH*
Sitting on the sidewalk is a gorgeous antique bedframe. “Is it free? Is it free?” I pester my buddy, as if he had otherworldy knowledge that I did not. Sure enough the makeshift sign taped to the palm tree said FREE!
What providence! I recently got a new roommate and downsized from a queen mattress (that was acres to big for me) to a nice and comfy twin. Yet I had no bed frame. I had been sleeping with my mattress on the floor because I absolutely refuse to spend even forty dollars on a cheap-o ikea bed frame. I knew someone, somewhere had to have one they didn’t need, but I assumed it would be someone in my family or friends, and that it would just be a very simple standard one. Who knew that right around the corner, adorable bed frame destiny awaited me!

It is a gold color and super sturdy, regardless of it being pretty old-looking.

I think my favorite part is the owl on the tag that says “1/3 your life is spent in bed”.
Why, thank you kind, wise owl!
Finding the bed frame made my week, but the luck didn’t stop there! We were rummaging through the boxes of free things that held mostly a huge assortment of candles, and my friend said, “Oh look, shoes!”
(O_0)

Both of them are my exact size! GAHH SO CUTE!
I don’t know what the deal is today, but the universe sure is like, “Hey. Let’s cut Sam a break, kay?”
I feel like I need to rewrite that one line in the Decemberist’s Mariner’s Revenge song:
“Oh, what providence, what divine intelligence, that I should find these things for free!“
Providence, luck or karma?
Who knows? But the universe sure does tend to provide for you if you keep a bubble of positivity around you.
The shoes will satiate the urge I’ve had to spend money (on shoes) lately, and the bed frame means I don’t have to sniff carpet dust every morning!
Also it is so romantic and reminds me of my childhood when I’d pretend my canopy bed was a castle or fortress.
First I’d be trapped:

And despair:

And then the ANGER!

The attempted escape:

But finally, a newfound acceptance of my gilded cage.

Okay, I’m done being over-dramatic.
But I did learn a storybook lesson today.
All it took to brighten my day / save me money / get me taking silly pictures was some unwanted stuff that a lady chose to give away rather than trash it or try to make money off it.
Her decision created a little bit of providence, happy little providence waiting patiently on the curb waiting for someone who needed it.
It’s nice to know that you can create providence/luck for another person.
It’s super cheesy, but my sweet new bed frame has inspired my to “pay it forward” as they say.
I think I’ll go through all the stuff I’ve been hoarding and maybe leave some books with cute “Read me, I’m yours now!” notes or something.
Aw, gosh! I feel so fuzzy inside! I think I need to go squeeze something fuzzy on the outside (HERE KITTY, KITTY!), drink some tea and daydream now.
Wishing you some providence,
Sam


